Introduction
The first time I’d ever heard about wicking beds was on Costa’s Garden Odyssey (TV show on SBS). I was really impressed by the concept and by its efficient user of water, not to mention being low maintenance! Eager to learn more, I found quite a few resources on the Internet that provided great information on this subject. Many thanks to those who have shared their experiences and given others (like myself) a great starting point.
In a nutshell, “wicking” is the process by which water travels upwards via capillary action. In a veggie garden, this means that water stored in a reservoir beneath the soil can be “wicked up” by the root systems of plants, into the soil above. This promotes deeper root development in plants, and means much less watering due to less water being lost to evaporation, since it’s stored deep down below.
The discovery of wicking beds came at the perfect time for us, as we were already discussing options around how to set up our veggie garden at our new home. We’d already decided that our veggie garden would be made up of raised beds, but the big question was whether to set them up as wicking beds or not.
After weighing up the pros and cons, we decided to take the plunge, knowing it would mean a greater challenge for us, and more work too! Due to our busy lifestyles, the idea of only needing to water once a week during summer gave us all the motivation we needed to get cracking.
Below is how we constructed our wicking beds, with photos showing each and every step along the way.
We hope you find this information useful and that you’ll be inspired to construct some wicking beds yourself.
Petar & Tetyana
How To
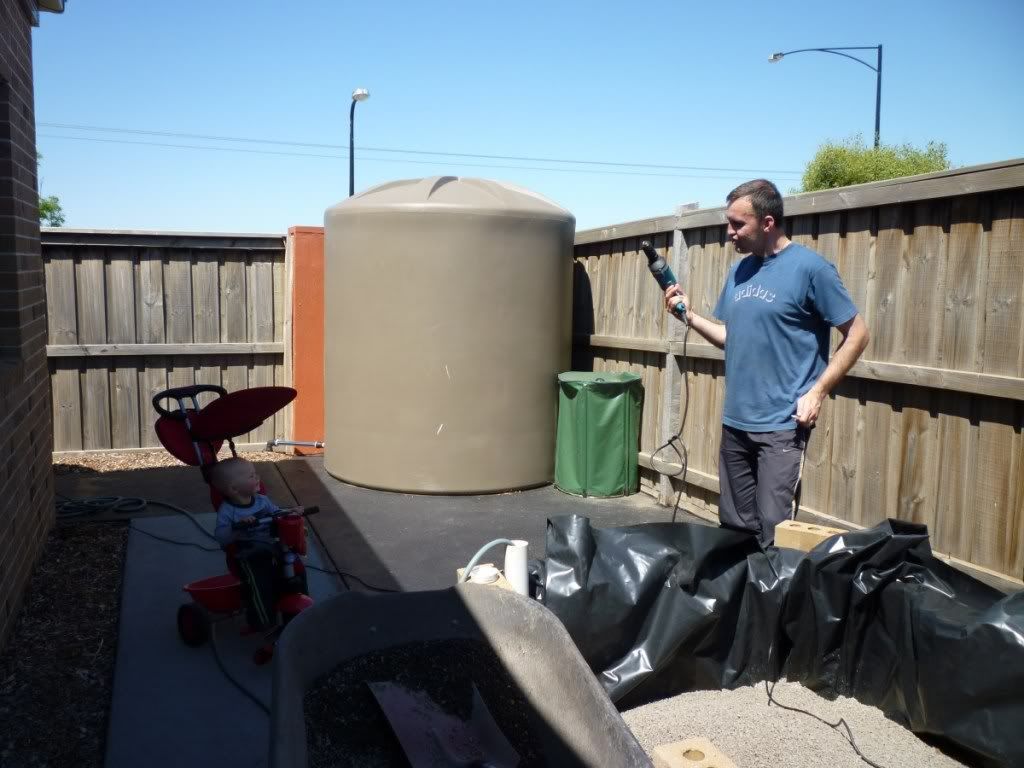
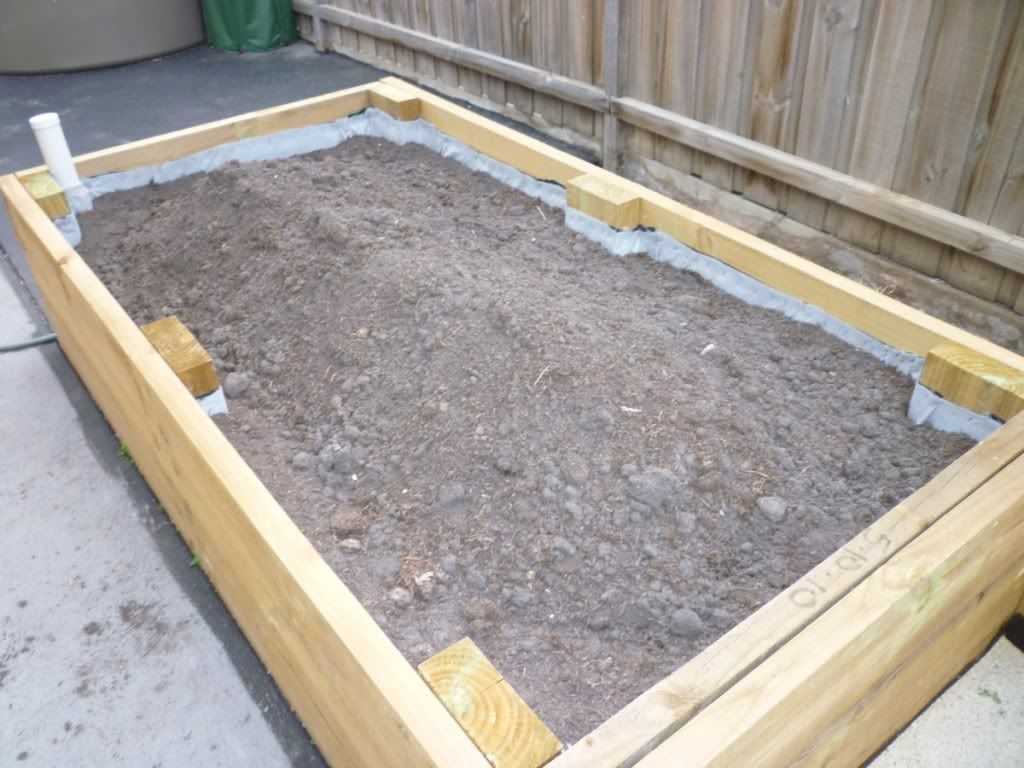
Construct the raised bed. We used ACQ-treated pine sleepers that are 5cm thick and 20cm wide. The raised bed is 2.4m long, 1.2m wide, and 60cm high.
Cover the bottom of the raised bed with 5cm of sand and level it out using a spirit level. This provides a flat surface for the wicking bed, and covers any rocks or other objects that could potentially puncture the plastic lining of the wicking bed.
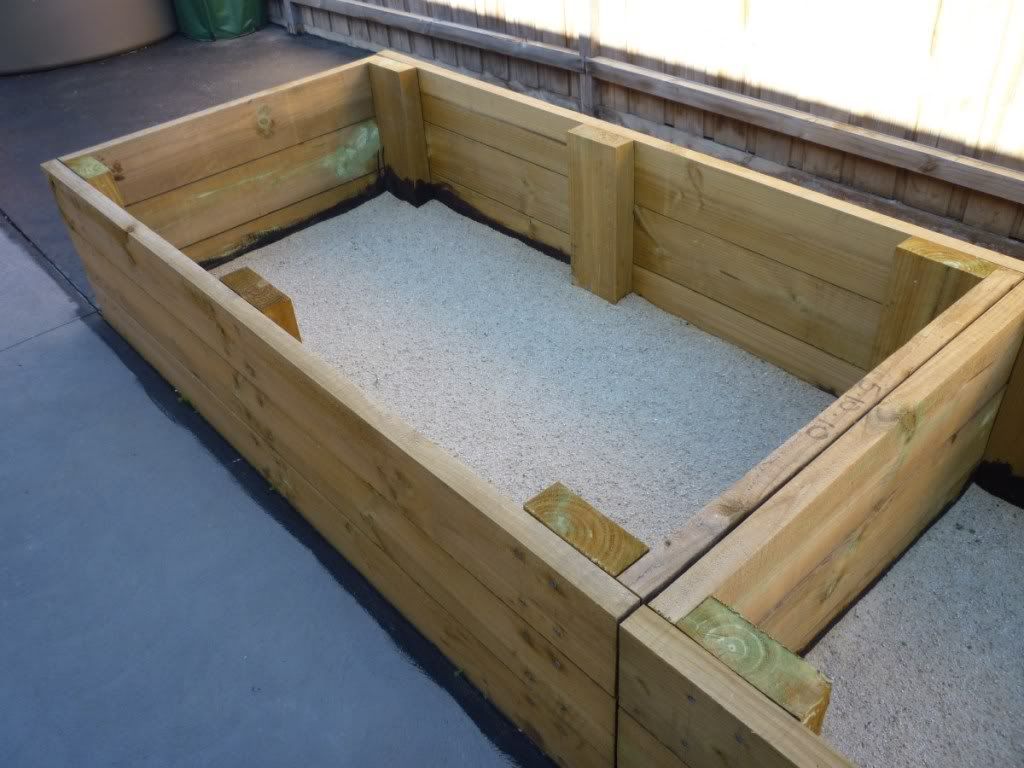
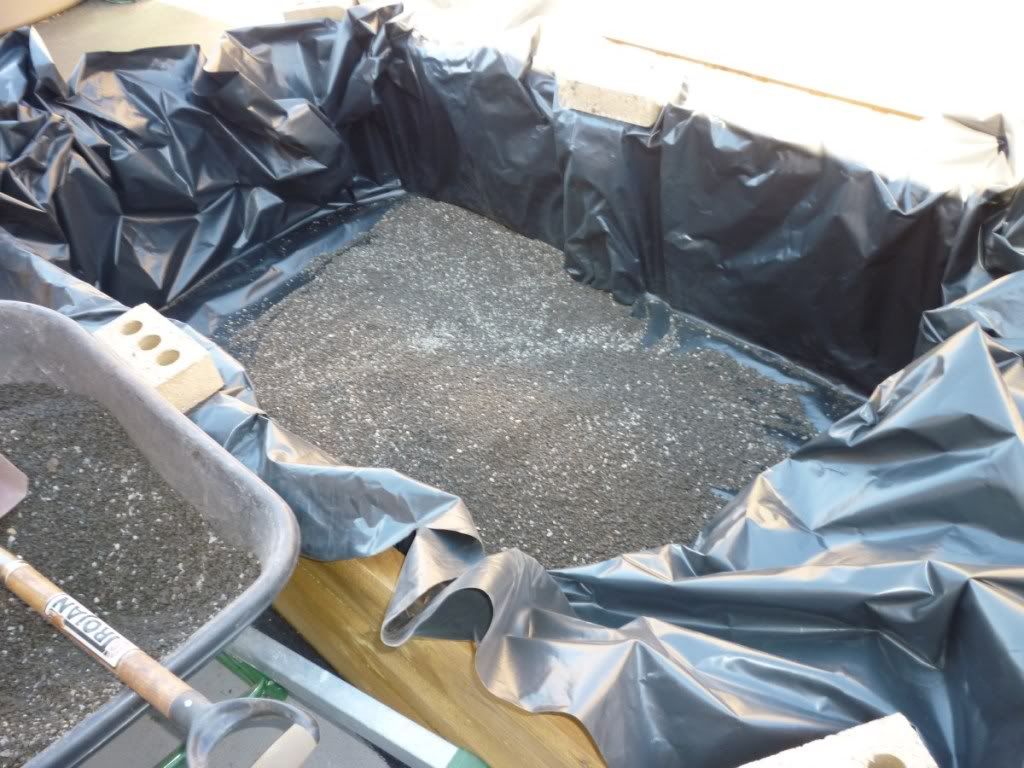
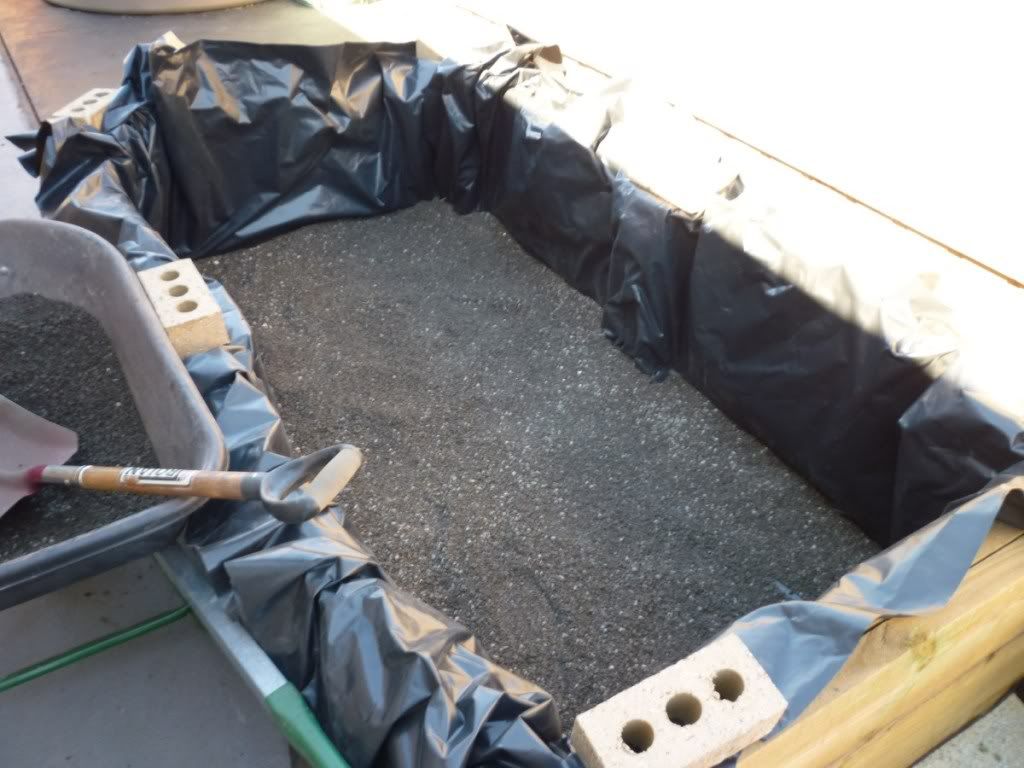
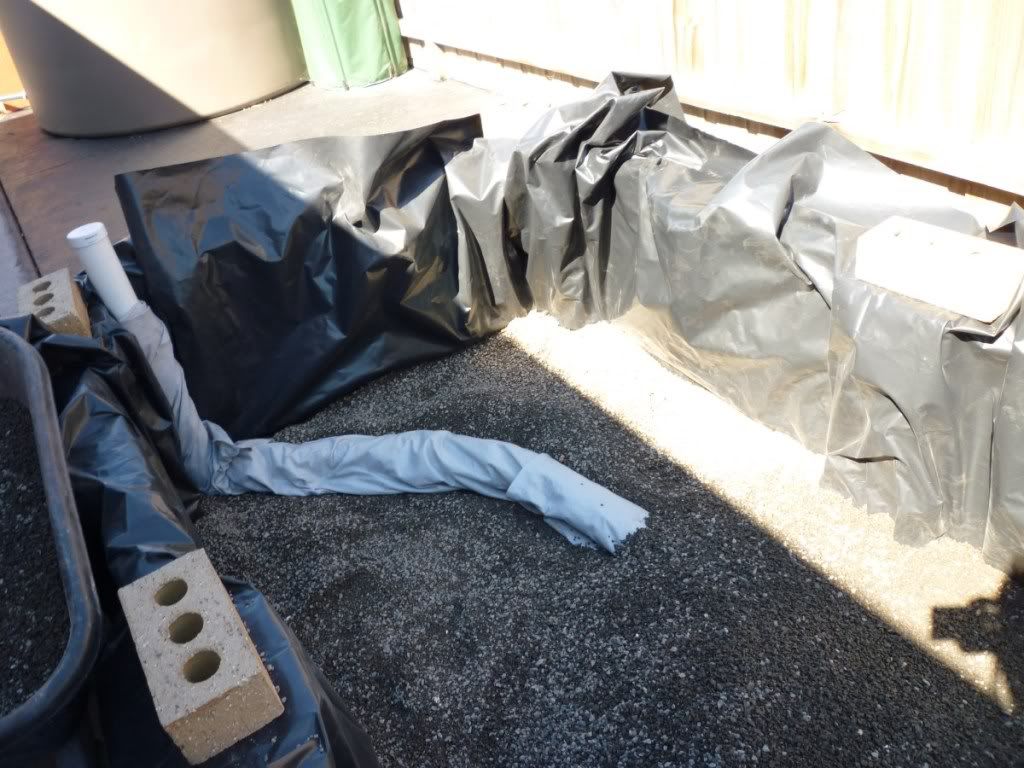
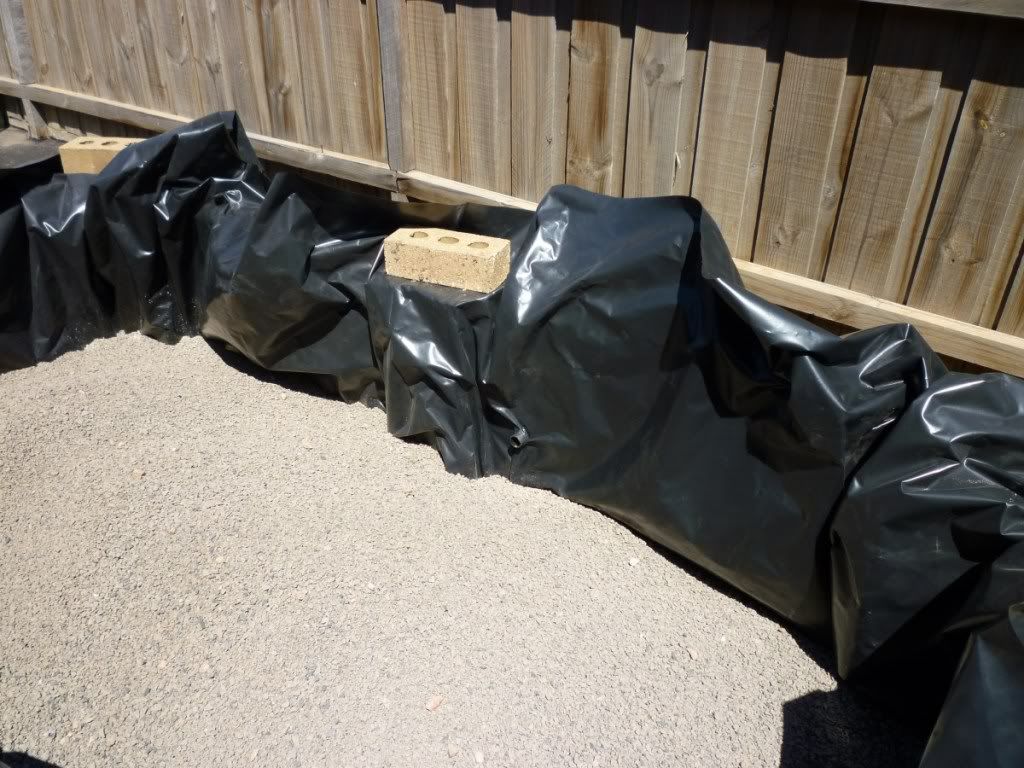
Line the bed with 200um builder’s plastic. Inspect the plastic to make sure there are no holes. To prevent the plastic from being blown around, we used bricks in each corner to hold it in place.

Start filling the bed with a few centimetres of screening rock.
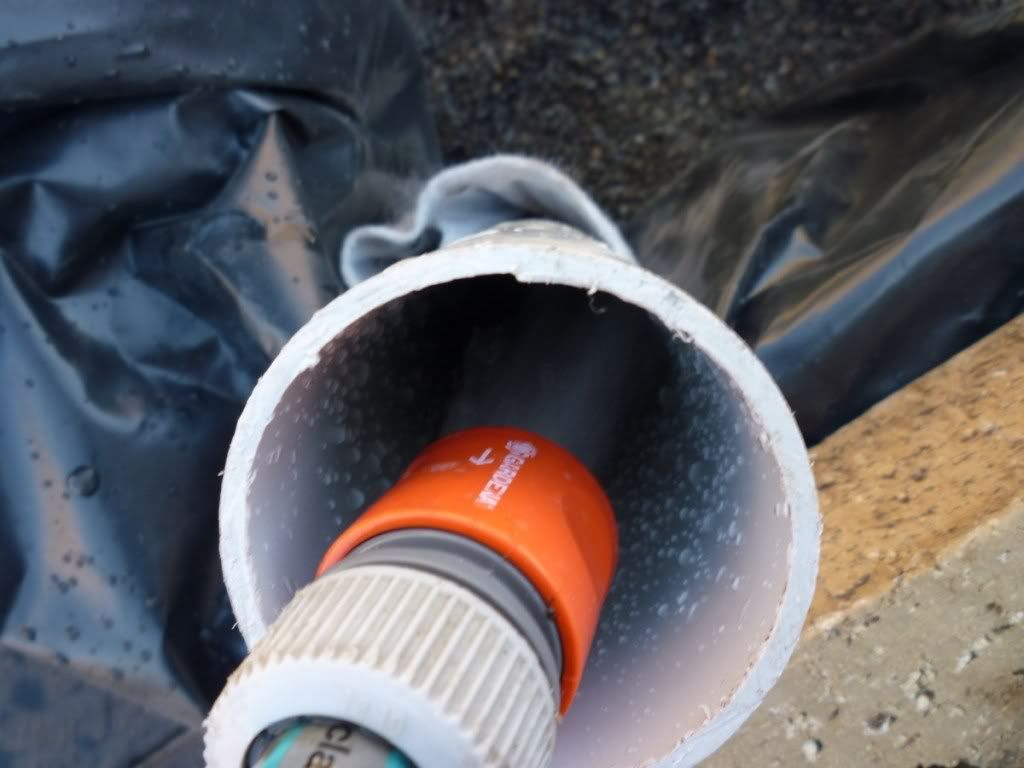
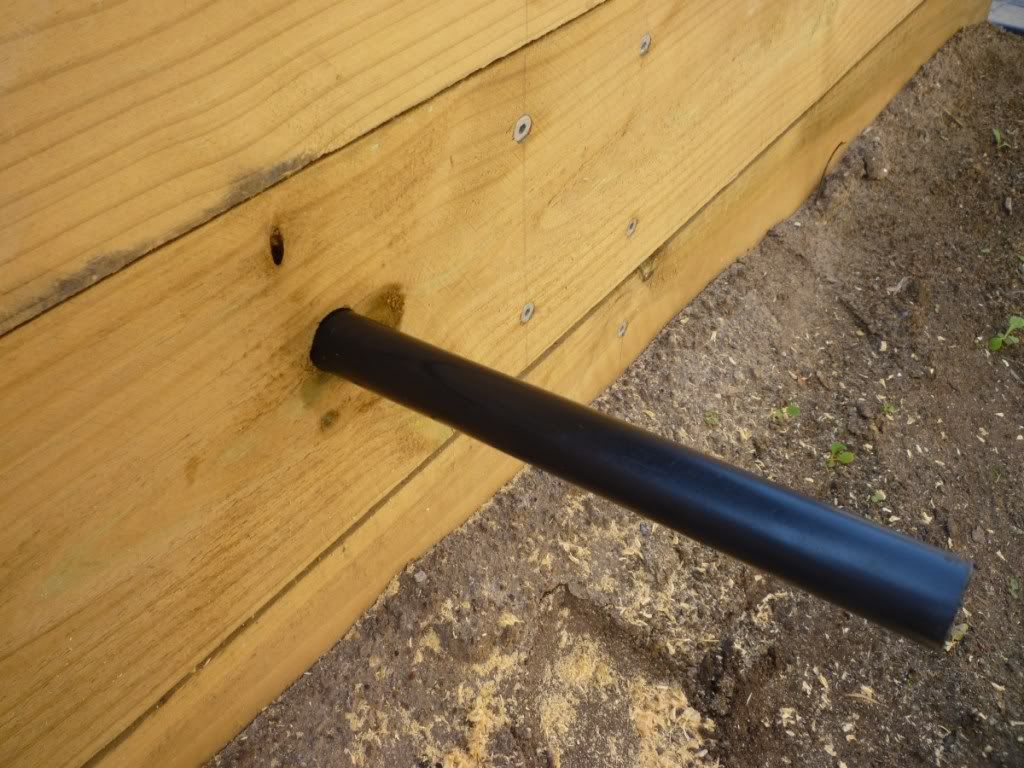
Connect the agi pipe to the PVC pipe using the elbow, and attach the other pieces as shown.
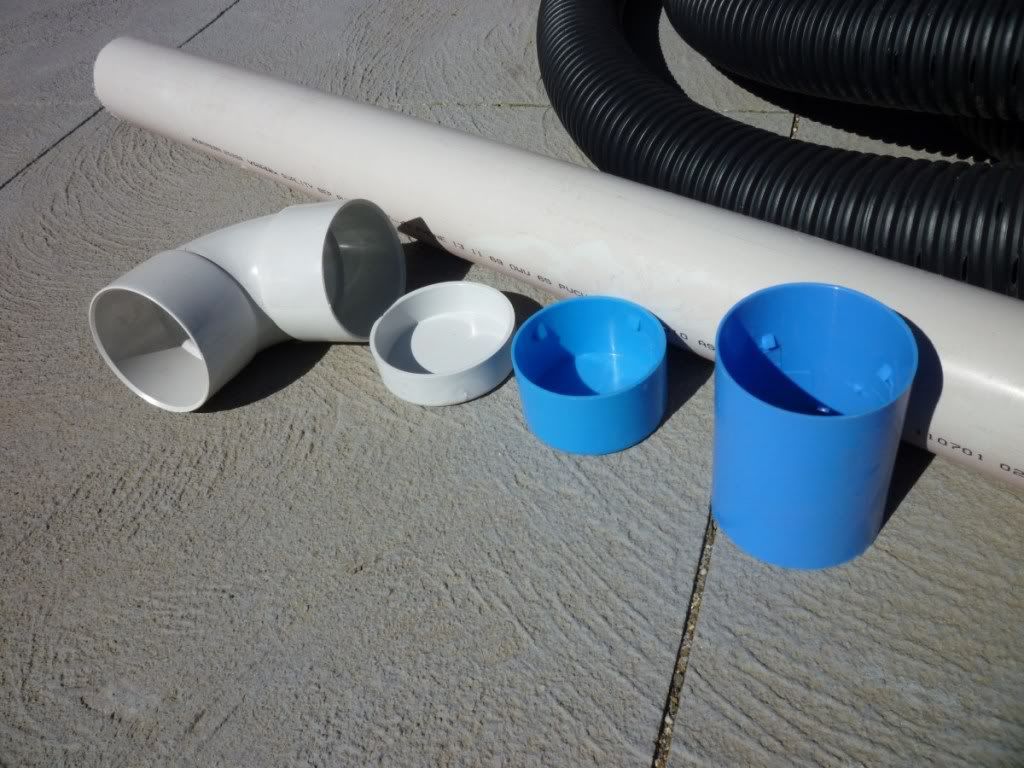
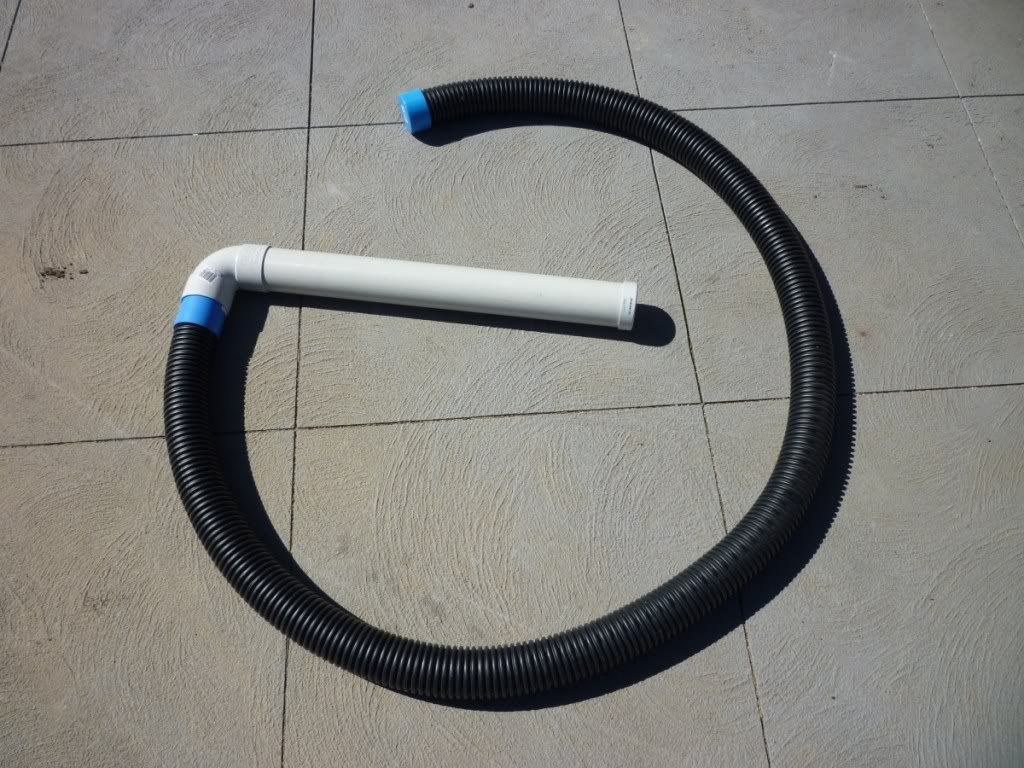
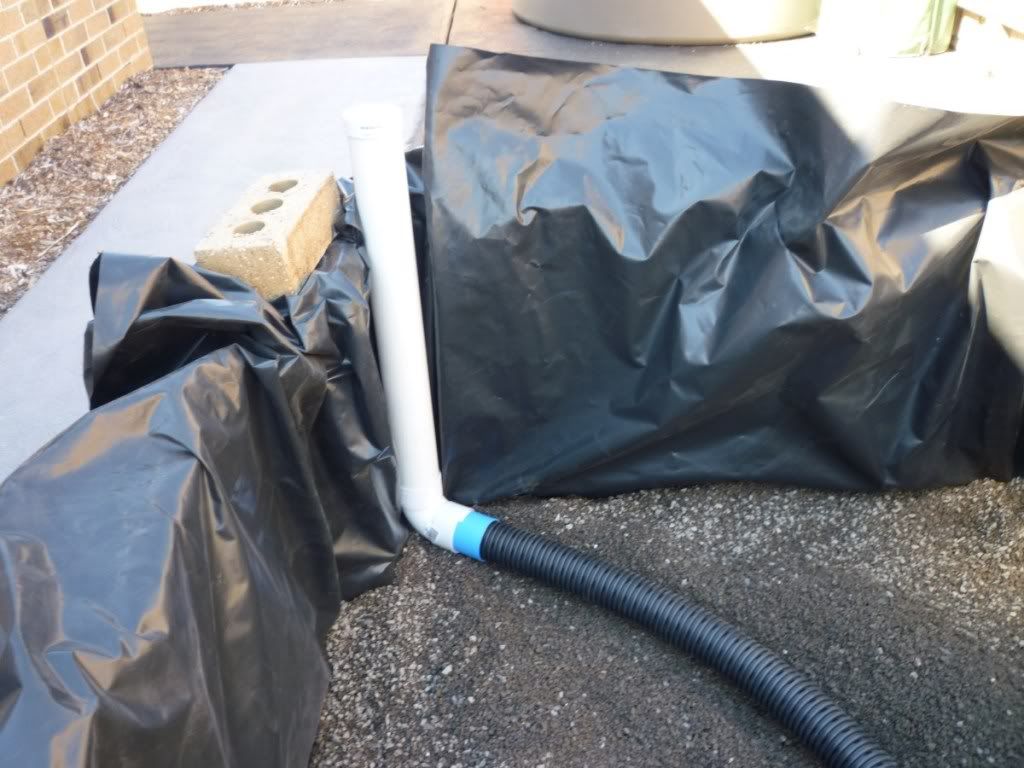
Place the pipes into position so that the PVC pipe sits up against the corner of the bed, and the agi pipe runs along the bottom of the bed.
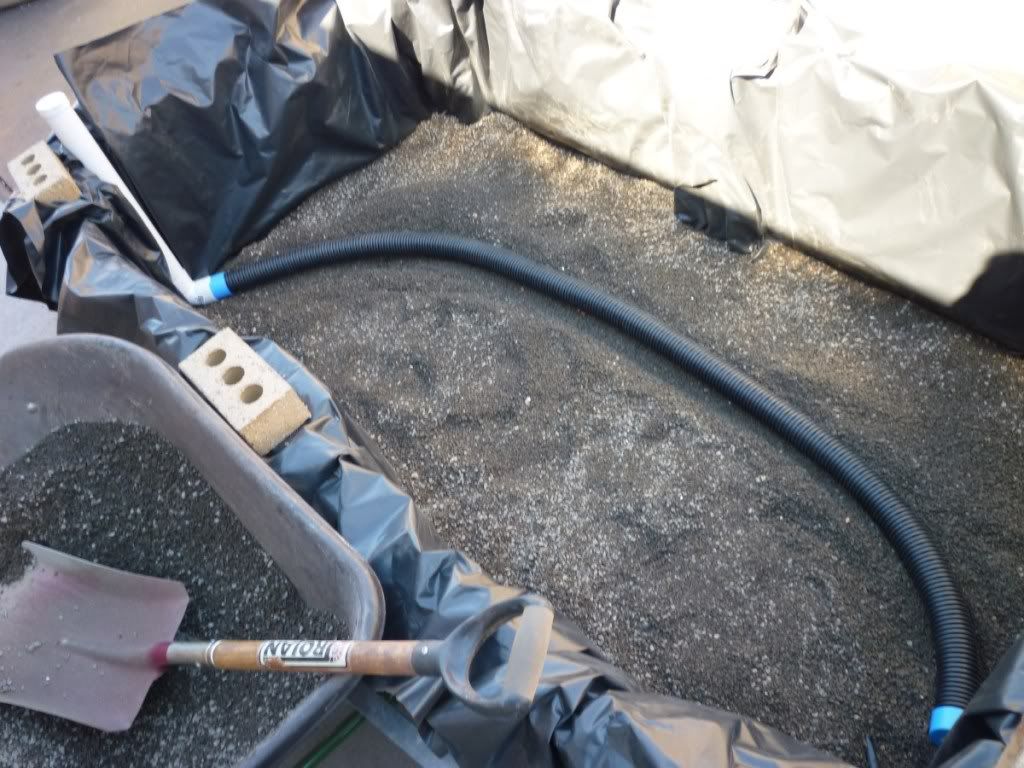
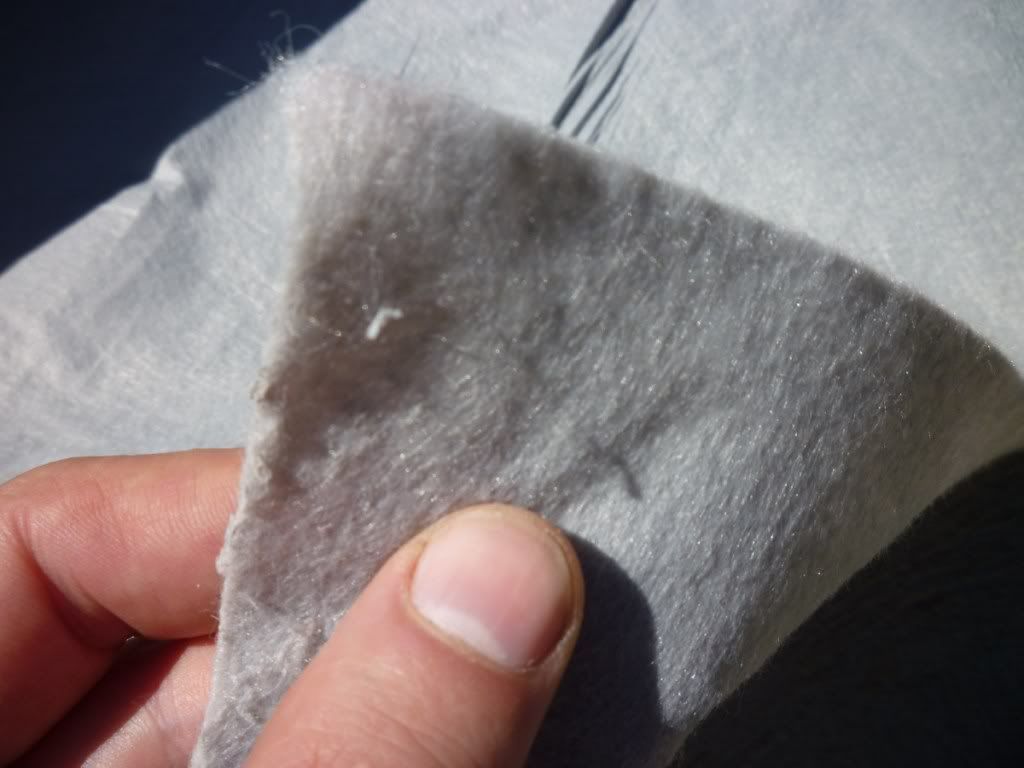
Wrap the agi pipe and bottom part of the PVC pipe in geotextile fabric. This ensures that rocks, soil, etc. are kept out of the pipe, and that only water can pass through.

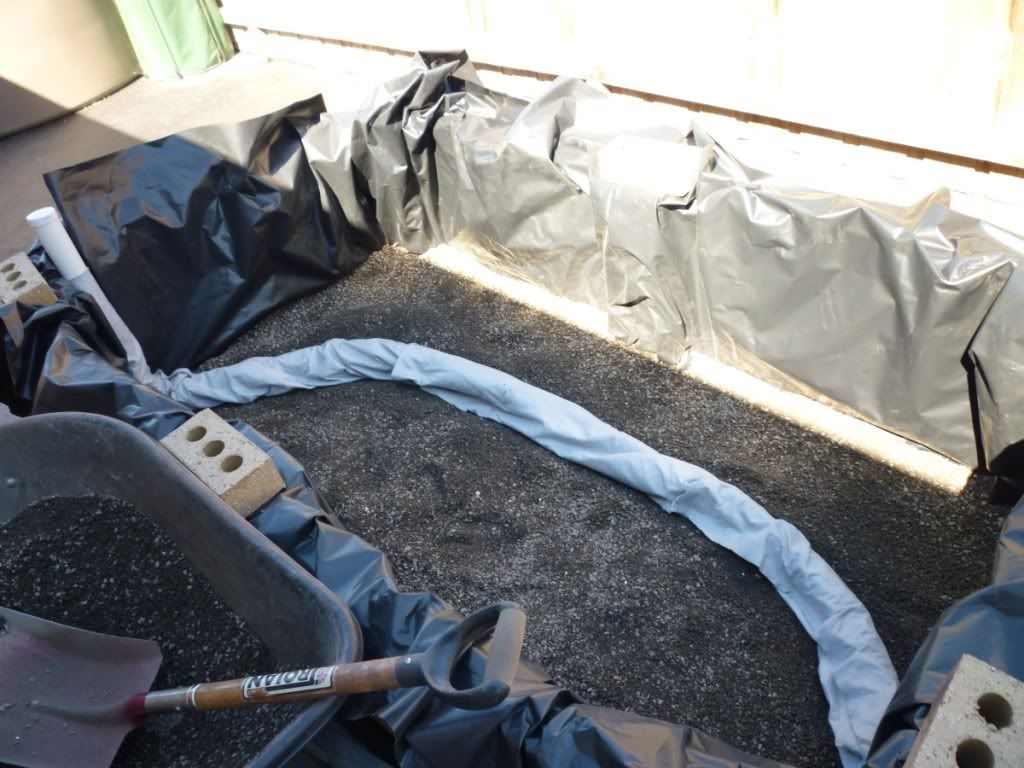
Continue filling the bed with screening rock. While doing this, add water (via the PVC pipe) until it reaches the level of the screening rock. Leave it for a while to ensure there are no leaks.
Take a brief time-out to lecture your kids on power tool safety precautions!

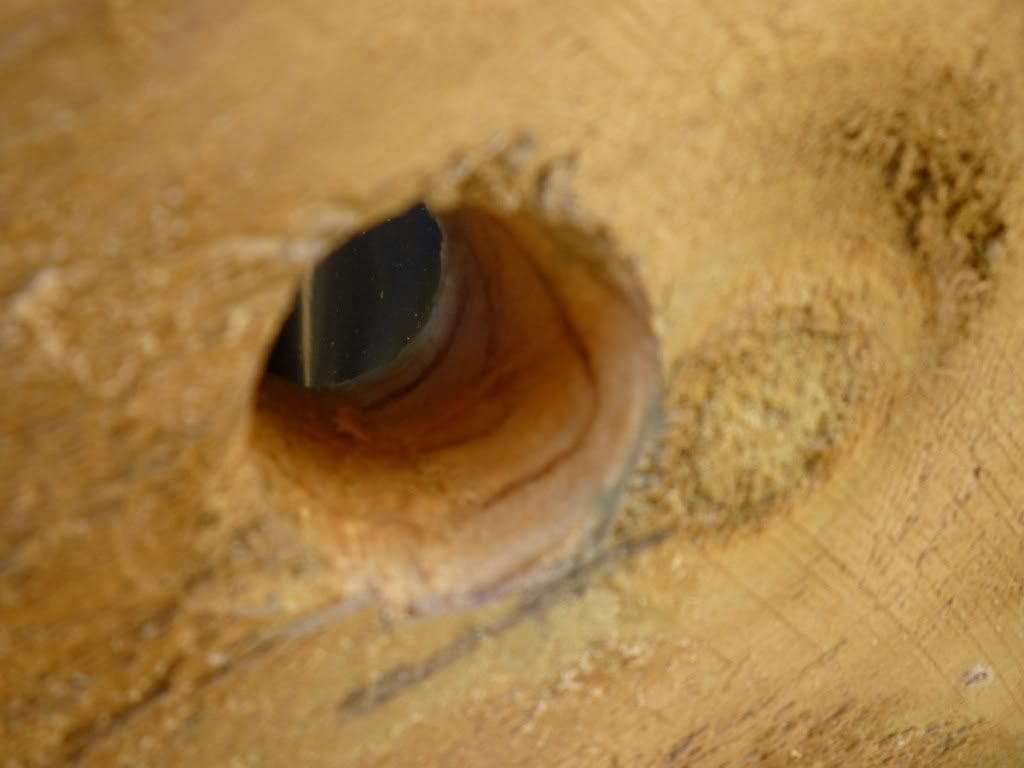
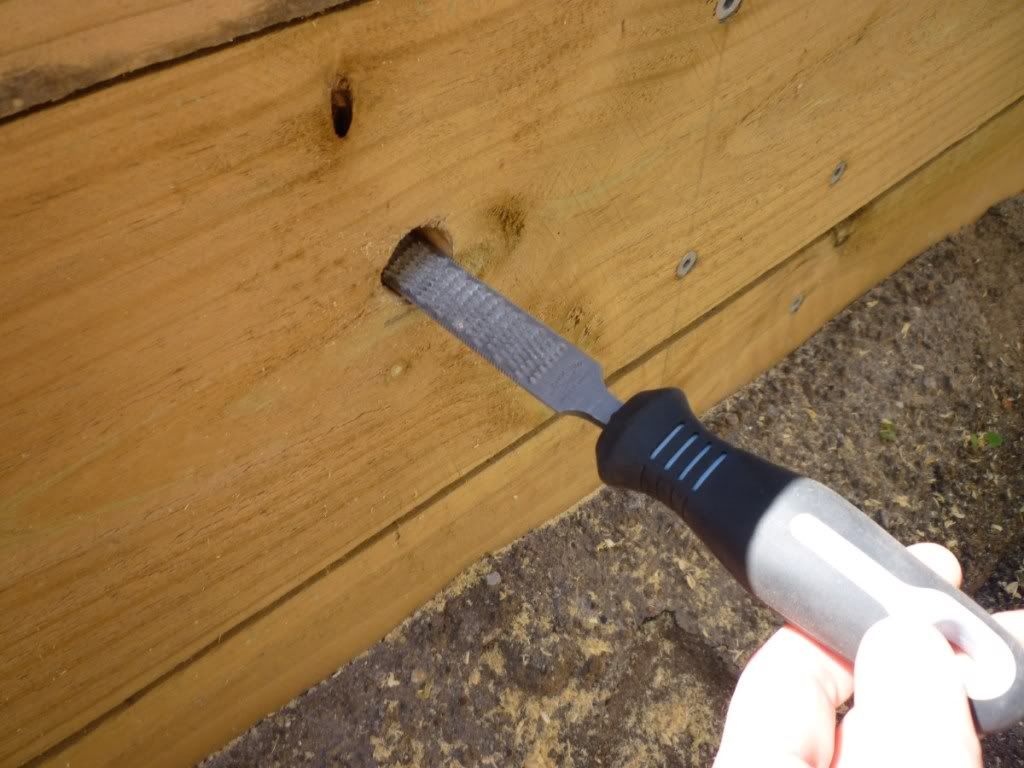
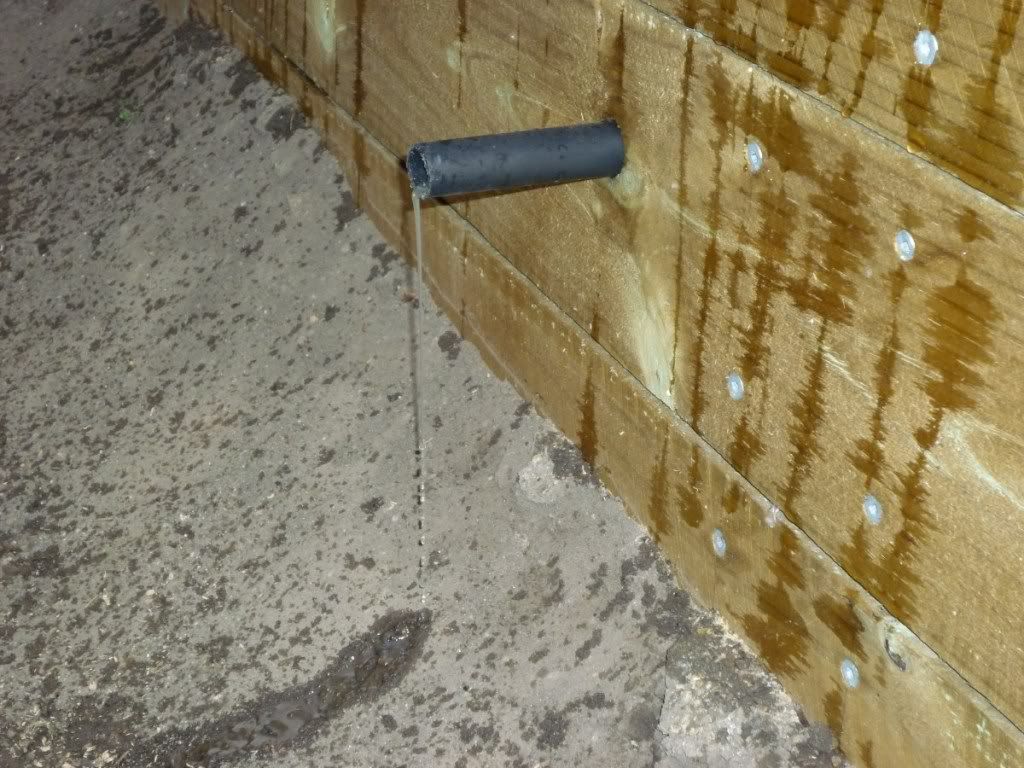
Drill the overflow hole and insert the overflow pipe. We drilled this hole so that the lowest part of the hole sits just above the top of the screening rock layer (i.e. at a height of 30cm). For the overflow pipe, we used a piece of irrigation tube.


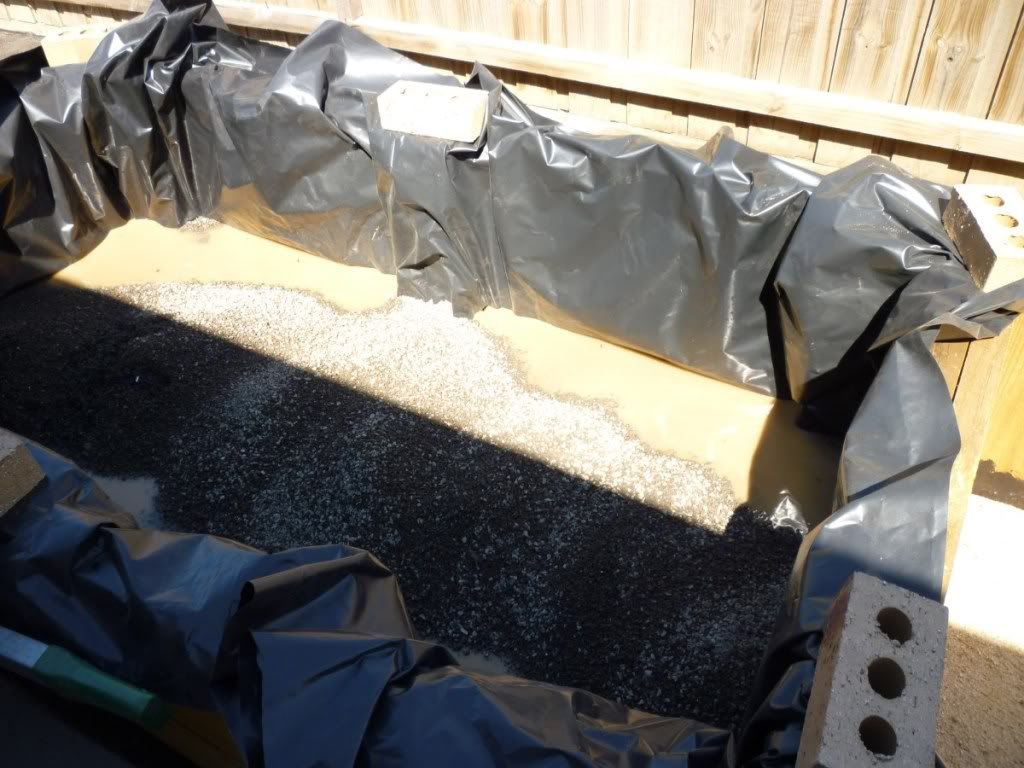
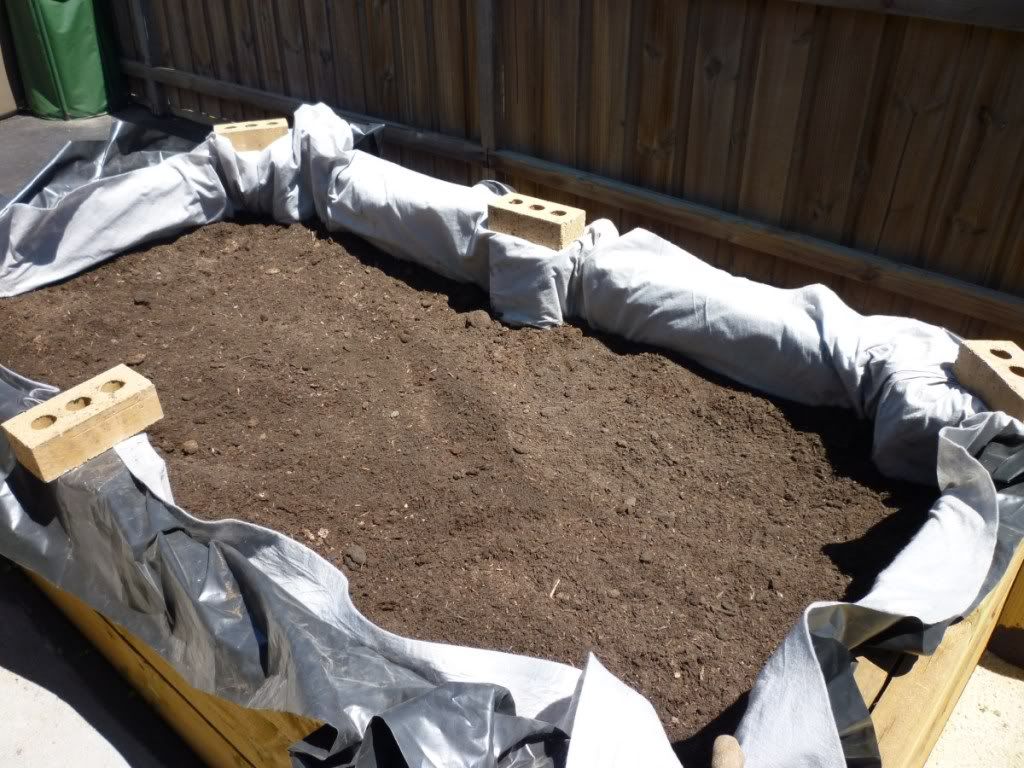
Continue filling until there is 25cm of screening rock. Use a spirit level to ensure a flat, even surface.
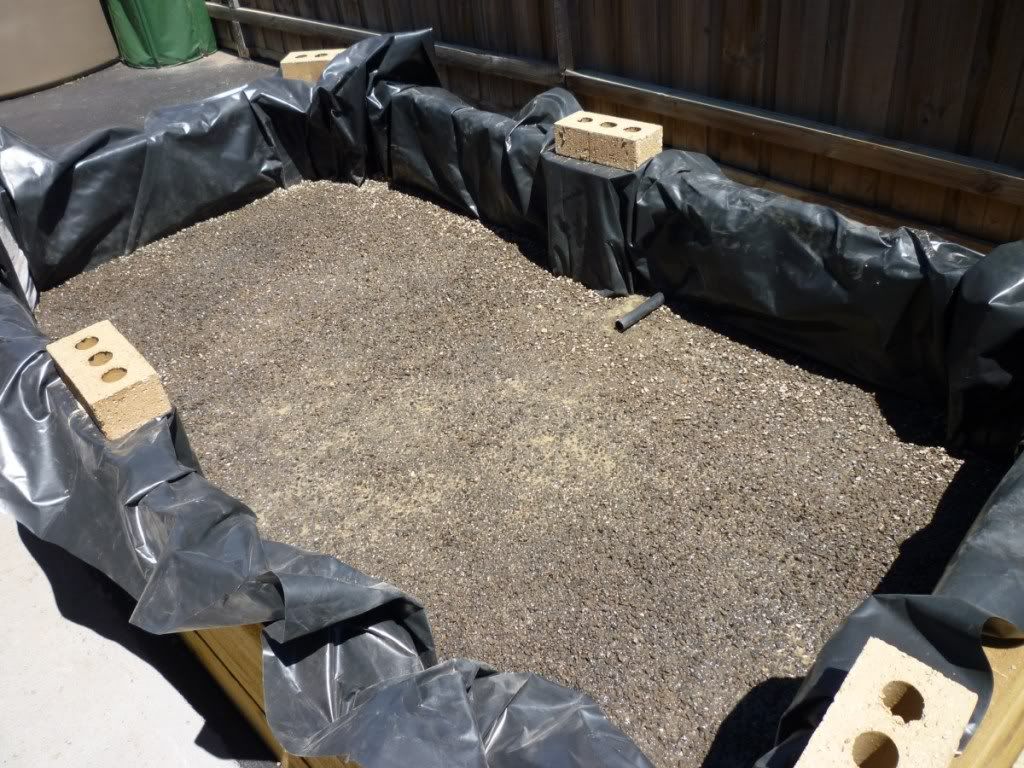

Cover the screening rock and sides of the bed with geotextfile fabric. This will keep the soil layer and screening rock layer separated, while allowing water to pass though between these layers. This fabric is very durable stuff and great for assisting with the wicking process.
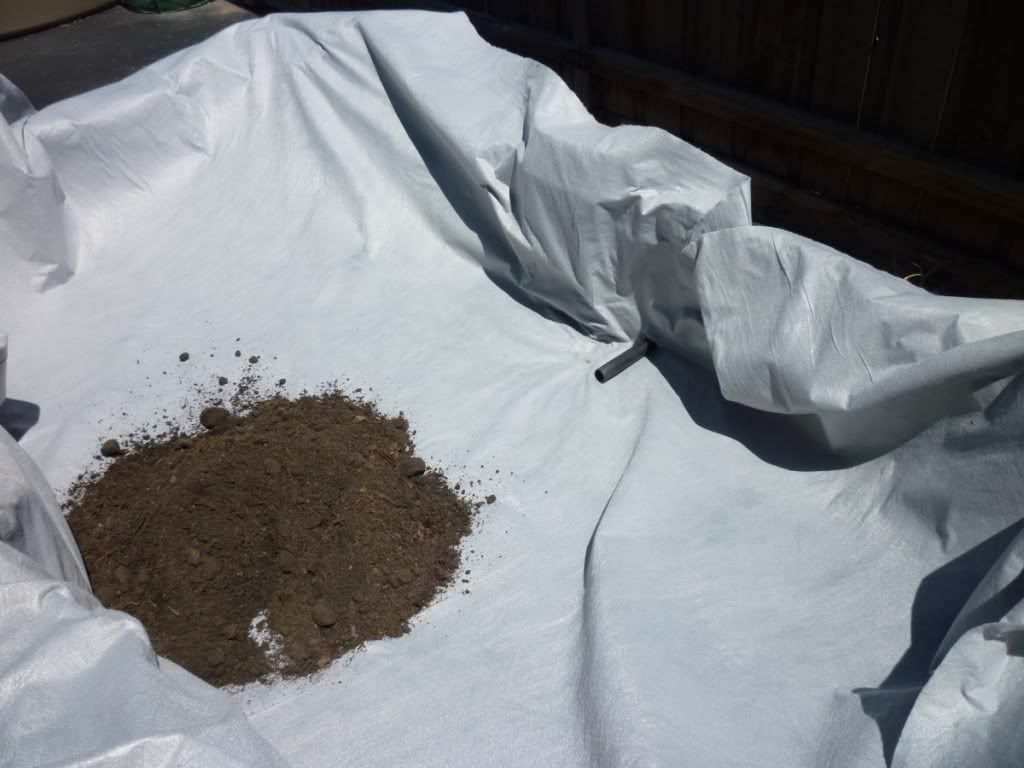
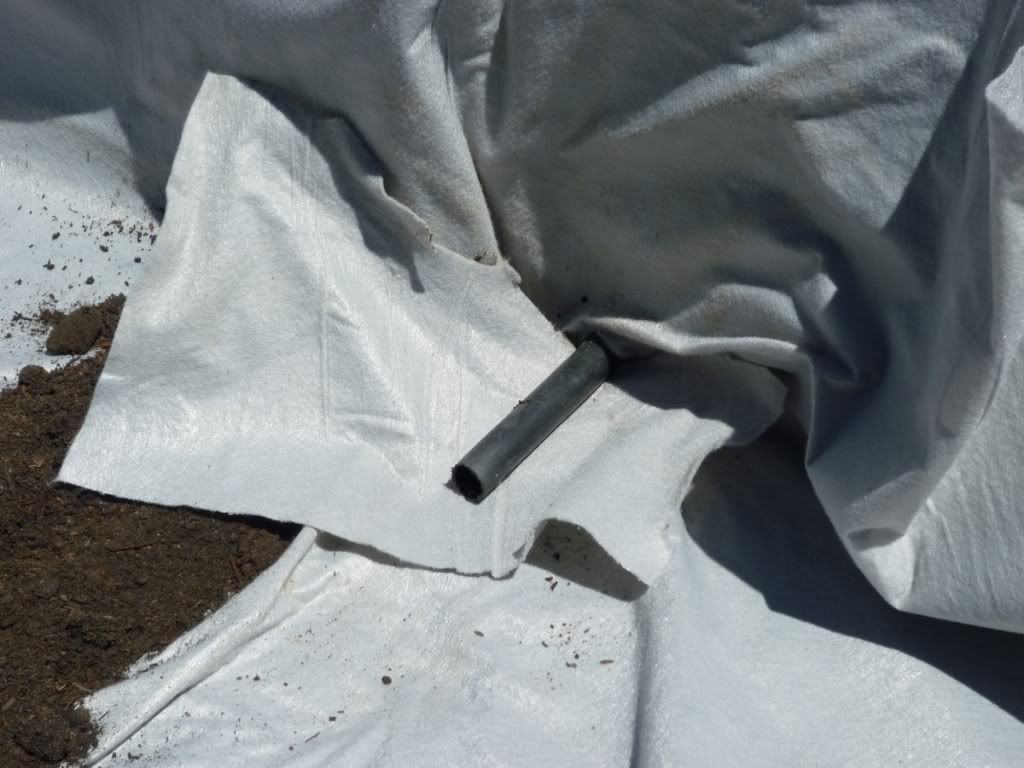
Wrap the overflow pipe in geotextile fabric to prevent it from clogging up with soil.

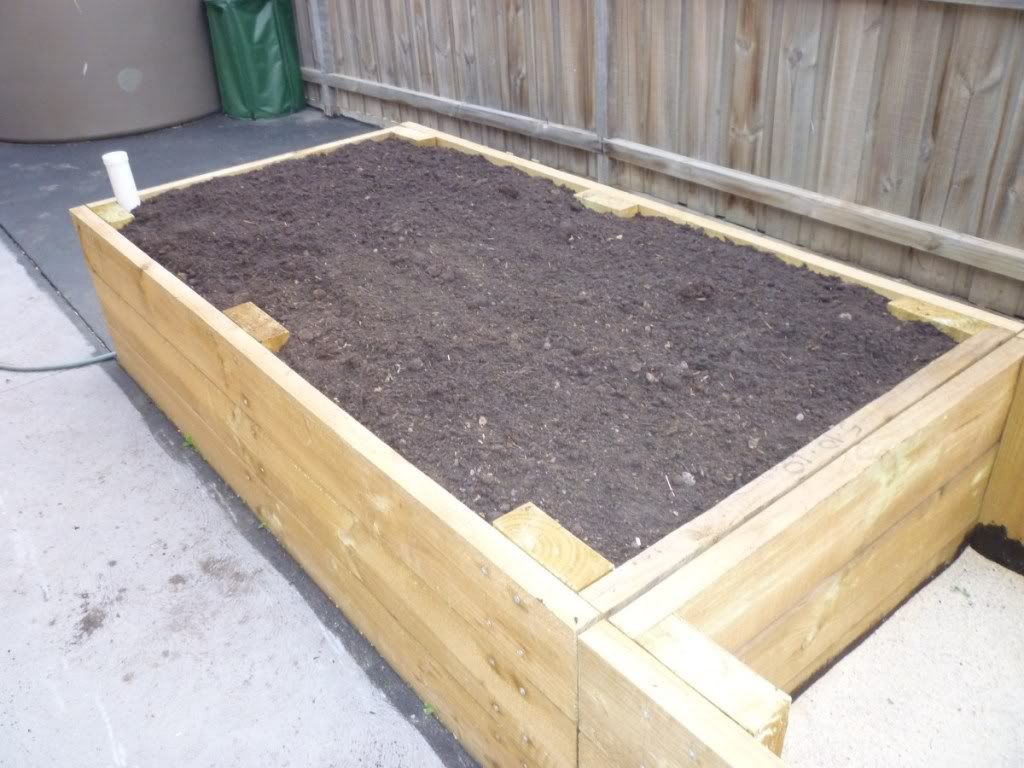
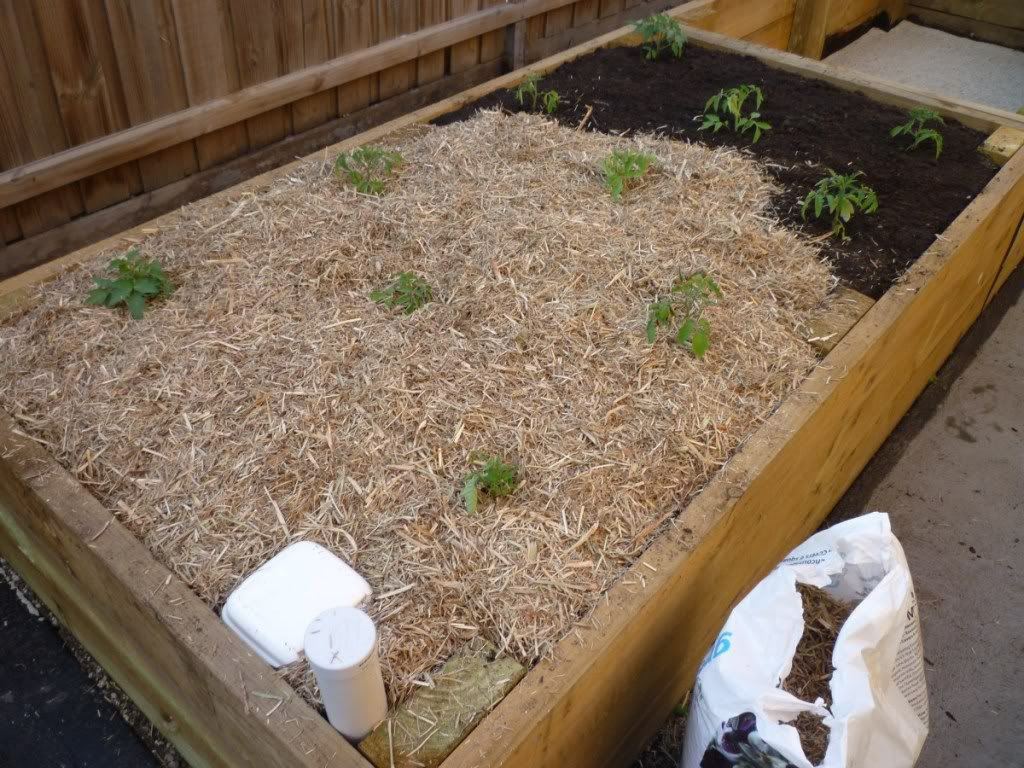
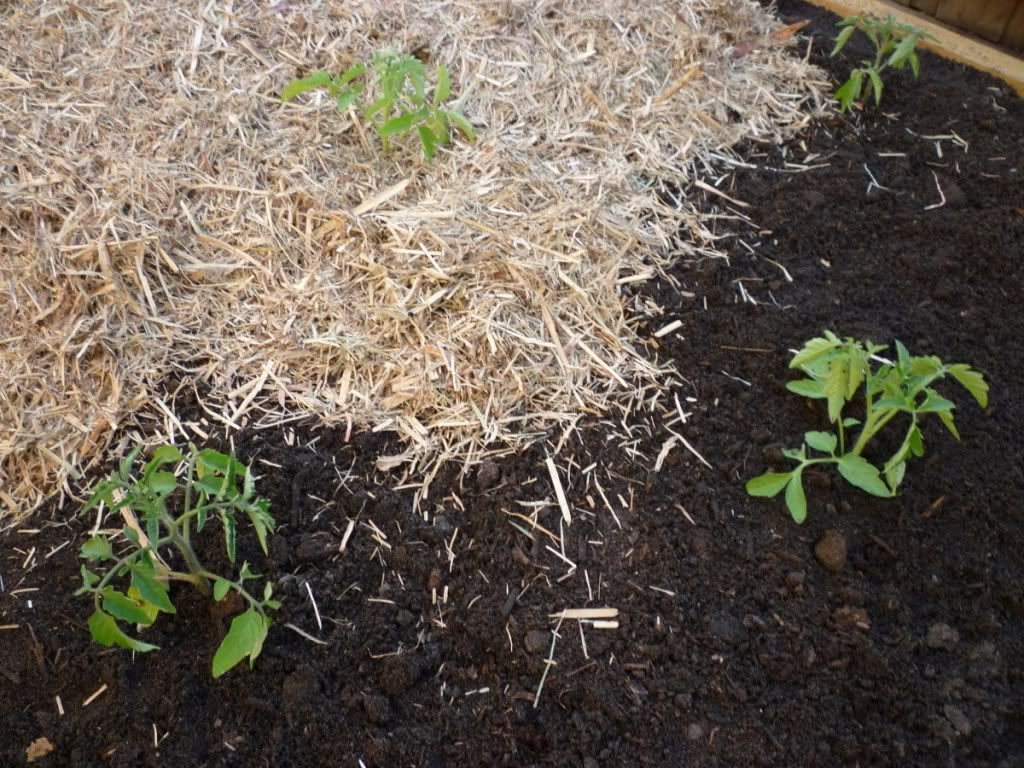
Fill the remaining 30cm of the bed with soil. We used a mix of 50% mushroom compost and 50% garden mix. We filled with about 25cm of soil, so that the remaining 5cm could be used for mulch.
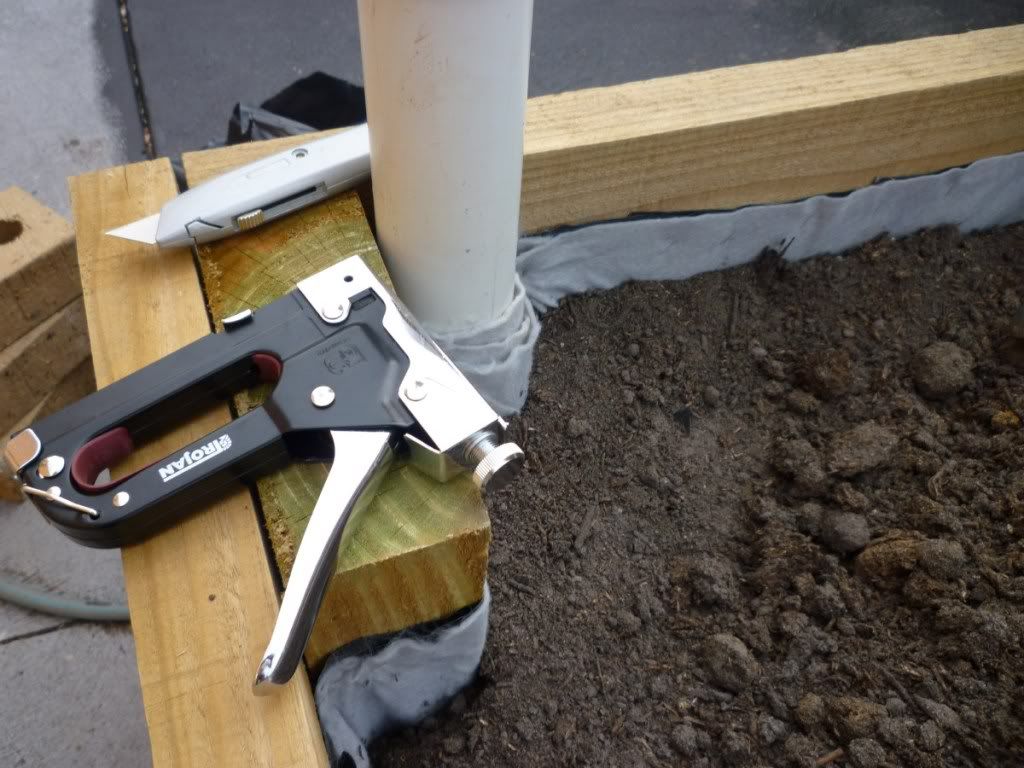
Cut away the excess builder’s plastic and geotextile fabric at the top of the bed, and staple the remaining material to the bed. We cut off just enough of this material so that it wouldn’t be visible once the bed is completed.
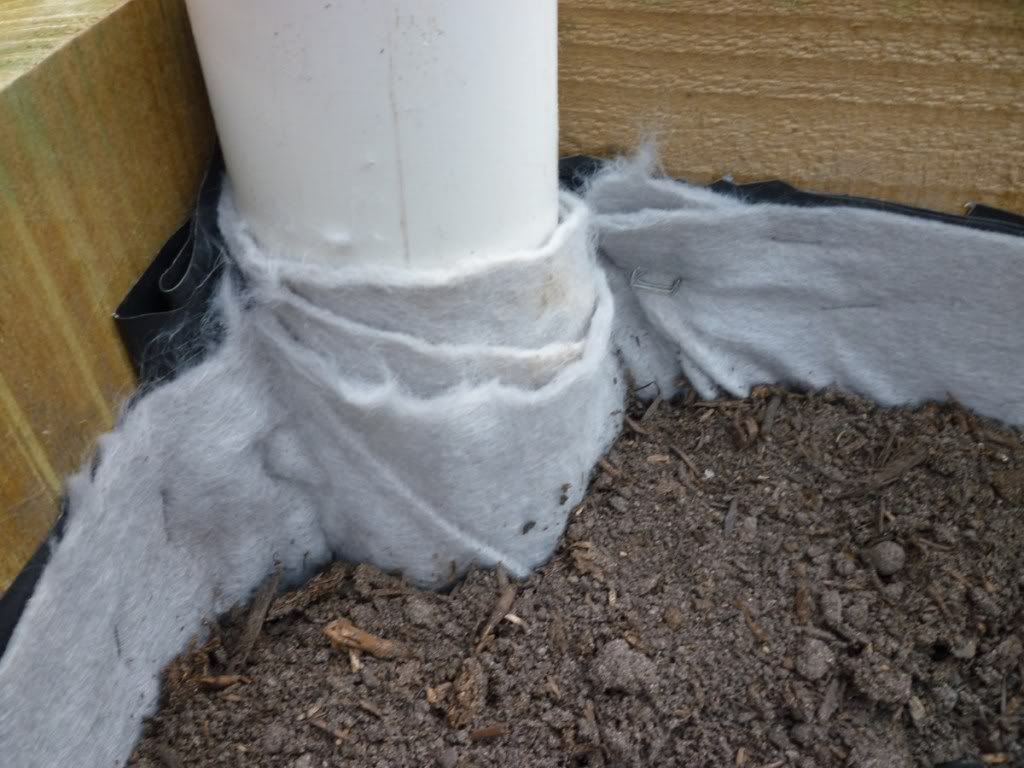
Fill in with more soil to cover the stapled material and level out the soil.

Water the soil until the excess water begins to flow out of the overflow pipe.

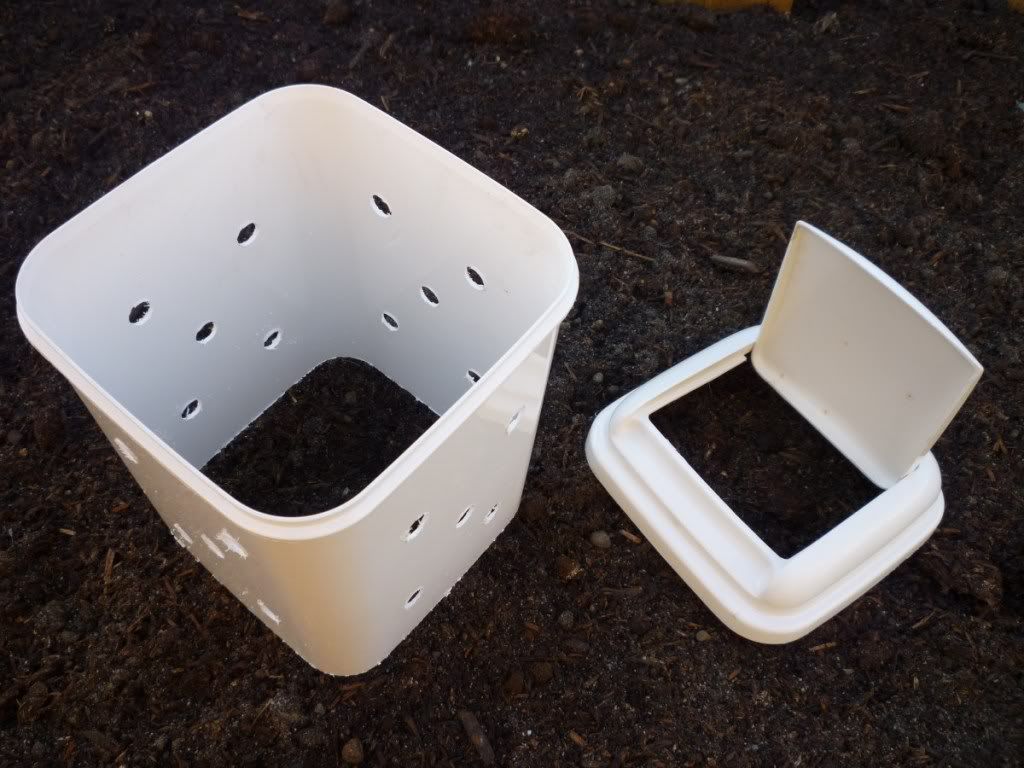
For the worm feeder, obtain a small plastic bin. Cut off the bottom and drill several large holes into the sides. Bury the bin into the wicking bed, so that the lid is just above the soil level. Add some compost worms and regularly top up with food scraps. These worms will multiply and their castings will continually add nutrients to your wicking bed.


Finally, plant your veggies and add a thick layer of mulch to suppress any weeds and minimise moisture evaporation.


Cost breakdown
Below are the items used to construct a single wicking bed. Although some of the materials can only be purchased in rolls, or in greater lengths than required, I have scaled down the cost of these materials so that they only apply to a single wicking bed. The amounts are shown in Aussie dollars (AUD).
| No-dig raised garden bed | $220 | Ecowood Plus |
| 65mm PVC end cap | $5 | Bunnings |
| 65mm PVC elbow | $7 | Bunnings |
| 65mm PVC pipe (60cm length) | $5 | Bunnings |
| 65mm agi pipe joint coupling | $2 | Bunnings |
| 65mm agi pipe end cap | $3 | Bunnings |
| 65mm slotted agi pipe (2.5m length) | $5 | Bunnings |
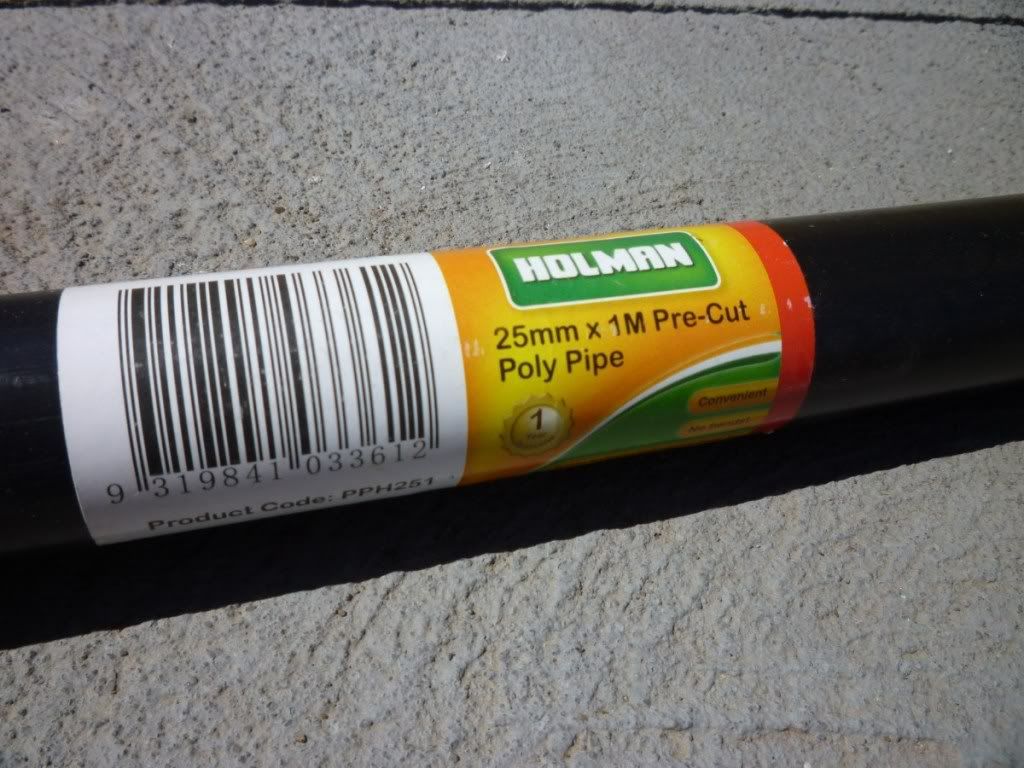
| 25mm drip irrigiation tube (for overlow) | $1 | Bunnings |
| 200um builder’s plastic (4m x 2.5m sheet) | $6 | Bunnings |
| Bidim Filterwrap geotextile fabric (2m x 3.5m sheet) | $11 | Pasco |
| Sand (1/4 cubic metre) | $15 | Garden supplies |
| 7mm screening rock (1/2 cubic metre) | $25 | Garden supplies |
| mushroom compost / garden mix (1/2 cubic metre) | $25 | Garden supplies |
| Total | $330 |
Resources
Constructing garden Wicking Beds – Sullivan, Mairéid
http://www.maireid.com/wickingbeds.html
Costa’s Garden Odyssey – Episode 3: Wicking Garden Beds
http://www.sbs.com.au/shows/costa/listings/detail/i/1/article/6172/Wicking-Garden-Beds
Scarecrow’s Garden: Wicking Beds
http://scarecrowsgarden.blogspot.com/p/wicking-worm-beds.html
Water Right
http://waterright.com.au
Easy grow vegetables
http://www.easygrowvegetables.com
Wicking test on five materials
http://www.flickr.com/photos/cicada/4596614379/
HomeOne Forums: Landscape & Garden Design
http://forum.homeone.com.au/viewforum.php?f=19
Ecowood Plus – No Dig Veggie Garden
http://www.ecowoodplus.com.au/all-products/no-dig-veggie-garden.aspx
Contact Information
For more information, you can send me an email at pkozul@yahoo.com.

#1 by Rob on November 29, 2011 - 11:57 pm
Wicking Beds! What a fantastic idea, when arranging my own veggie garden i will definetly use this blog as a guide. Thanks Petar!
#2 by Fab on November 30, 2011 - 11:52 pm
This is such a great blog. Its great how you show the step-by-step process!!
I hope you can show up to date progress of how the garden grows!!
Keep up the good work!
#3 by Stephen on December 1, 2011 - 7:13 pm
I have a question, though. You used screening rock in the bottom of your bed instead of an ‘organic matter’ (I have seen wood chips used a lot) I’ve seen some obscure references to the ‘problems’ of using organic matter instead of the screening, but no details on what the problems are. Do you think you could shed some light on the subject?
#4 by pkozul on December 4, 2011 - 9:12 pm
Hi Stephen. Before starting our wicking beds, I was considering whether to use organic matter for the reservoir layer. Colin Austin recommends this approach. Since the organic material would eventually break down, you’d have to replace it sooner or later. Some people are concerned about anaerobic effects of this matter remaining saturated. In such beds, you’d probably need to allow the water level in the reservoir layer to drop very low before topping up again, in order to allow the organic matter to “breathe”. In our case, we were looking at setting up veggie garden beds to be as “low-maintenance” as possible, which is why opted for using materials that will not break down. Screening rocks seemed like a good option. Maireid Sullivan used them in her wicking beds and reported great results. Also, the article I linked to above, “Wicking test on five materials”, shows gravel as being a good wicking material, and this is close enough to what we used – 7mm screening rocks. Other materials such as sand, scoria, blue metal,etc. have been used in wicking beds, and they all seem to do the job. Cheers. Petar.
#5 by Marcello on December 18, 2012 - 4:28 am
What a great blog! When I get my house I am definitely installing a wicking bed! Thanks Petar!
#6 by maialalumiere on July 14, 2013 - 5:24 pm
It has been more than a year since you posted this and your photos. How has this worked for you for the past year? Any problems you had to solve? Which plants grew well and which ones did not?
We have a wicking bed with tomatoes and they are not doing so great. I see you had tomatoes planted – did they produce well? Any information would be so helpful. I see lots of information out there on the internet about wicking beds but not a lot of feedback about what grows and what doesn’t.
Thanks for your help!!!!
#7 by James on December 27, 2015 - 12:10 pm
This is a great guide, really liked the worm farm. I was also contemplating wrapping geotextile around the overflow pipe as you have done, looks good.
#8 by BigSash on May 23, 2016 - 4:01 am
Very useful and good pics.
I would have reservations about using treated pine anywhere near food production, it’s possible to buy pool liners that are fish safe and therefore less likely to transfer plastic crap into the water/soil, and we’ve used coarser rock that I think allows the reservoir to hold more water.
Cheers.
#9 by Barbara Williams on May 12, 2020 - 4:11 am
Thank you, this site was SO helpful! I put sand in the bed (bath) which immediately flowed into the slotted ag pipe, thus clogging it up. By wrapping the Ag pipe in the geo textile first, my problem should be solved!!